Table of Contents
ToggleA pergola isn’t just a garden structure anymore, it’s the centerpiece of modern outdoor living. Whether you’re looking to add shade, define a seating area, or create an Instagram-worthy backdrop, today’s pergola designs blend form and function in ways that older versions never did. In 2026, homeowners have access to materials that resist rot and fading, minimalist aesthetics that suit contemporary homes, and smart features like integrated lighting and motorized shade systems. This guide walks you through seven modern pergola ideas that fit different budgets, spaces, and skill levels, plus tips for installing one yourself if you’re ready to take on the project.
Key Takeaways
- Modern pergola ideas have evolved beyond simple shade structures to become multifunctional outdoor living hubs that define gathering spaces and complement contemporary home design.
- Contemporary materials like composite, aluminum, and powder-coated steel offer durability and low maintenance, with composite and aluminum lasting 20+ years without the rot and fading issues of traditional wood.
- Minimalist pergola design with clean lines, slim posts spaced 8 feet apart, and 12–18 inch slat spacing creates uncluttered aesthetics that suit modern homes and require less visual distraction.
- Motorized shade systems and bioclimatic louver designs deliver active climate control, cooling spaces by 10–15°F on hot days, while passive options like climbing vines and shade cloth provide flexible, budget-friendly alternatives.
- Smart lighting enhancements using warm LED string lights and solar uplights extend usability into evening hours, transforming a pergola into a versatile outdoor room for entertaining and relaxation.
- DIY pergola installation is achievable for homeowners with basic carpentry skills, though frost-proof footings, proper permits, and structural accuracy are critical—hiring out footings and consulting local building codes prevent costly mistakes.
Contemporary Materials and Finishes
Composite and Weather-Resistant Options
Gone are the days when a pergola meant untreated wood that needed staining every two years. Modern composite materials, typically a blend of wood fibers and plastic polymers, resist rot, insects, and UV fading without annual maintenance. Brands like Trex and TimberTech dominate the market, but composite decking companies now offer pergola-specific beams and slats that match residential deck profiles.
Aluminum pergolas have also gained traction. They’re lightweight, rust-proof, and can be powder-coated in virtually any color. An aluminum pergola frame costs more upfront than wood but lasts 20+ years with zero deterioration. For a rustic modern hybrid, steel frames with wood slats, powder-coated steel for durability, deliver structural strength and warm aesthetics.
When choosing materials, consider your climate. Coastal areas and wet climates favor composite or aluminum: drier regions can support pressure-treated lumber rated for ground contact (typically 40-60 lb/cu in retention). Always check local building codes, as load requirements and wind resistance standards vary by jurisdiction.
Minimalist and Clean-Line Designs
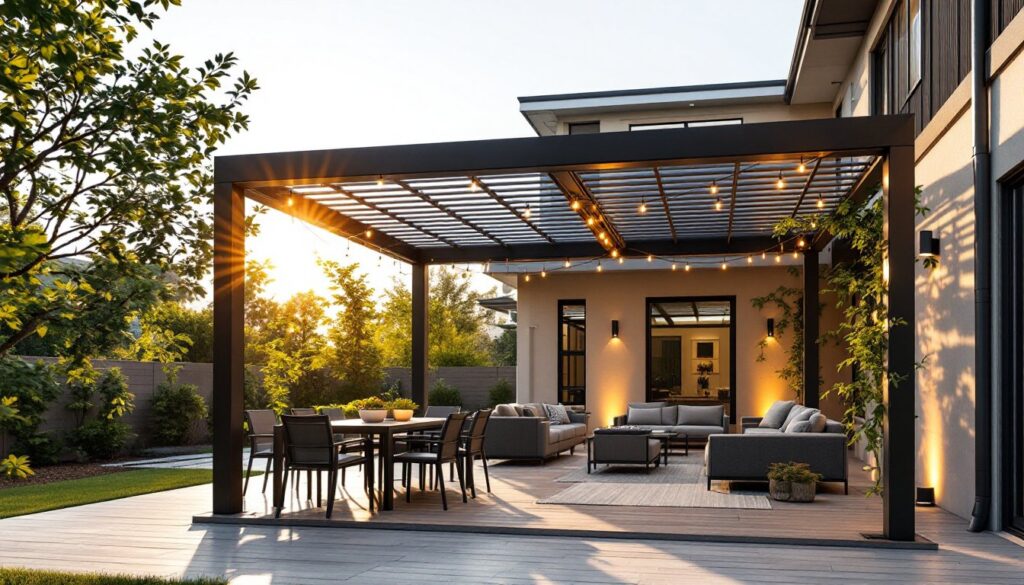
Minimalist pergola design strips away ornate scrollwork and Victorian fussiness. The modern aesthetic emphasizes straight lines, open grids, and negative space. Think slim vertical posts, evenly spaced horizontal slats, and a no-frills footprint, exactly what contemporary home architecture demands.
A clean-line pergola typically features a 3×3 or 4×4 post (nominal dimensions: actual sizes are 2.5″ or 3.5″) set 8 feet apart, with 2×6 or 2×8 beams running perpendicular. Spacing between overhead slats is often 12–18 inches, allowing dappled shade without blocking the sky entirely. This geometry feels intentional and uncluttered.
Color plays a role too. Charcoal gray, black, or white pergolas suit modern homes. Stained cedar or composite in warm gray tones work for transitional designs. Avoid heavy stains or bright colors unless your home’s exterior matches, cohesion matters more now than novelty. If you’re comfortable with free DIY furniture plans and woodworking tutorials, you’ll find simplified designs there that strip building to essentials.
Integrated Shade and Climate Control Solutions
A pergola’s primary job is shade, but modern versions do it smarter. Retractable shade systems, motorized roller shades or sliding panels, let you adjust coverage on demand. Install a motor-driven shade system on the roof grid, and operate it via remote or smartphone. These systems work best with aluminum frames (lighter load) and cost $2,000–$8,000 depending on size and automation features.
Another approach: add slatted roof panels with variable louvers that tilt to block or admit sun. Bioclimatic pergolas (a term for adjustable-louver systems) cool the space below by 10–15°F on hot days. They’re pricier but deliver genuine climate control.
For passive shade, dense climbing vines, clematis, wisteria (in appropriate zones), or jasmine, can transform any pergola by midsummer. Expect 2–3 seasons for full coverage. Pair this with a high-quality exterior fabric shade cloth (30–50% UV blockage) stretched between posts, and you’ve got flexibility without motors or complex installation. Improving your garden with a pergola often means layering shade options for seasonal adaptation.
Multi-Functional Outdoor Living Spaces
The pergola as a standalone shade structure is dated. Today’s designs anchor outdoor rooms, cooking, dining, lounging, and entertaining all happen beneath the same roof. Start by defining zones: a dining area with a sturdy table and weather-resistant chairs, a lounge zone with outdoor sofas, and perhaps a prep or bar area.
Build a pergola at least 12×16 feet to accommodate furniture and movement without crowding. Ensure your posts are frost-proof footings (holes 3–4 feet deep, below frost line for your region) or use adjustable deck posts to avoid heave in freeze-thaw cycles. Attach a weatherproof ceiling fan or misting system to combat heat and humidity.
Integrate grilling and countertop space at one end. A built-in storage bench with weatherproof cushions serves double duty. Add a side bar with beverage coolers, nothing fancy, just practical. Smart outdoor kitchens under pergolas have become status-neutral: they’re simply expected. Pair the structure with an outdoor design reference like Hunker to brainstorm layouts that match your family’s lifestyle.
Lighting and Ambiance Enhancements
Evening use transforms a pergola from daytime shade to outdoor room. Install warm LED string lights (2700K color temperature) overhead, weaving them through the slat grid or along the perimeter. String lights are plug-and-play: if your pergola is far from an outlet, run a buried or surface-mounted electrical conduit (check local code, some jurisdictions require licensed electricians for this step).
Recessed downlights embedded in beams deliver subtle ambient lighting without the kitschy bistro feel. Consider solar uplights at the base of posts, they charge by day and glow softly at night, requiring zero wiring.
For larger installations, consult a licensed electrician if you’re installing permanent wiring. Adding a motion sensor or timer to outdoor lights saves energy and adds convenience. Avoid overly bright lights: 50–100 lumens per light is sufficient for gathering spaces and walking safely.
DIY Installation Tips for Homeowners
A pergola is an achievable DIY project if you’re comfortable with basic carpentry. Here’s what you need to know upfront: structural pergolas require frost-proof footings (codes vary by region: check your local IRC), a level foundation, and accurate post spacing to ensure it doesn’t lean or twist. Large pergolas (over 200 square feet) may require a permit and engineer approval, ask your local building department before ordering materials.
Tools needed: circular saw (or miter saw for cleaner angle cuts), level, measuring tape, drill, socket set, and lag bolts (½” diameter, 10–12″ long) for post-to-beam connections. Safety first: wear eye protection, work gloves, and a dust mask when cutting pressure-treated lumber, it contains arsenic compounds (CCA or ACQ) that shouldn’t be inhaled.
Key steps:
- Mark post locations using a chalk line and string.
- Dig frost-proof holes (3–4 feet deep, depending on your zone) and set posts in concrete or adjustable footings.
- Ensure posts are plumb (perfectly vertical) using a 4-foot level.
- Attach beams using lag bolts, washers, and nuts, no nails alone.
- Install slats perpendicular to beams using corrosion-resistant fasteners (galvanized or stainless steel: never use regular nails, which rust and stain).
- Sand edges and finish with exterior stain or paint suited to your wood type.
Budget 2–4 weekends for a 12×14-foot pergola, depending on complexity. A second pair of hands makes post alignment and beam installation much easier, recruit a friend or neighbor. If footings or structural concerns intimidate you, hire that part out: the rest is manageable for a motivated DIYer.
Final Thoughts
Modern pergola design is no longer about copying a catalog picture. It’s about solving real problems, shade, gathering space, visual cohesion with your home, while choosing materials and finishes that work with your climate and maintenance tolerance. Whether you go composite, aluminum, or pressure-treated wood, clean lines, integrated function, and smart details make the difference. If you’re handy and willing to respect permits and building codes, a DIY build can save money and give you genuine pride in the result.